

When you think about nuclear radiation, you often think about power plants, but it turns out there’s radioactive stuff all over the place: smoke detectors, granite counters, bananas, and potatoes can all be mildly radioactive. Even some old tape dispensers. But those are all puny sources.
Radon is a colorless, odorless gas that is heavier than air. It is a byproduct of uranium decay, amonth other pathways, decays by emitting an alpha particle, and has a half-life of just about four days. As a gas, it escapes from rocks or soil. Usually, there isn’t much of it, so it vents harmlessly to the atmosphere. But it can easily get trapped in a house and accumulate. You might think your house is solid, but there are plenty of cracks, joints, and pipes where gas can weasel through, especially if your inside pressure is slightly lower than the pressure in the soil below, which is common.
As the radon decays, it can produce more radioactive material, including tiny amounts of polonium. With or without dust particles, these tiny bits of radioactive material can go airborne and end up in your lungs. There, they can further decay, and alpha particles damage cells and DNA. According to the EPA, radon exposure is the second leading cause of lung cancer in the United States, next to smoking.
Not So Speedy
If you get enough carbon monoxide in your home, you probably won’t see the next sunrise. But radon works very slowly. It is odorless and colorless. You won’t show any general symptoms to warn you that you might get lung cancer.
The effect can take years or decades. Of course, you can also have a house that has very little radon. However, nearly all homes have some radon. The EPA estimates that about 7% of homes have elevated radon levels.
Some areas are more prone to radon than others, but even if your area has low risk, there’s no guarantee that your house is safe. If you are lucky enough to not have a radon problem, you have nothing to worry about. But how do you know? Like anything, you need to test.
Testing
The simplest radon tests use activated charcoal to absorb radon from the air. After exposure for a few days, you mail the charcoal to a laboratory, which measures its radioactivity. These kits typically cost very little (well under $50). Like any radon detector, you want to put it on the lowest inhabited part of the house (that is, the basement or ground floor). The kit will give you exact placement details (usually a few feet up in a draft-free area). These tests are short-term and are typically exposed to the air for only a few days.
These charcoal pouches are adequate for quick screening tests. However, longer tests will probably require different techniques. To better assess long-term exposure risk, you’ll want a test that runs for more than 90 days.
Long-term detectors often use a special plastic film. Alpha particles striking the film leave microscopic damage tracks. After exposure, a laboratory chemically etches the film and counts the tracks to estimate radon concentration.
Naturally, there are electronic options, too. Continuous radon monitors use radiation detectors, often based on ionization or semiconductor sensing, to measure radon over time. These are particularly interesting because they reveal the considerable fluctuations that a short-term test can miss. Besides, radon levels also change with weather, season, ventilation, and even how the heating system operates. A single measurement doesn’t necessarily tell the whole story.
Too Much?
Radon is normally measured in picocuries per liter (pCi/L). One picocurie corresponds to approximately 0.037 radioactive decays per second, so a concentration of 4 pCi/L represents roughly 148 decays per second per cubic meter of air.
The EPA recommends mitigation when the long-term concentration reaches 4 pCi/L (approximately 148 Bq/m3), and suggests considering remediation even between 2 and 4 pCi/L. That isn’t a sharp safety boundary. Radiation risk increases with exposure, and no radon concentration is known to be safe.
Remediation
Before you go and try to make your house totally airtight, you should know that is probably not going to work. Instead, if you decide to act, you’ll want a sub-slab depressurization system like the one in the adjacent photo. This is little more than a blower fan that pulls air from under the slab and vents it out a tall pipe.
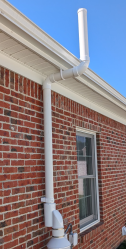
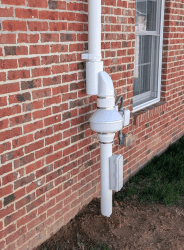
The fan is usually outside or in an attic. The exhaust has to be above the roofline. You want it far from other openings like windows so radon doesn’t get in. The low pressure tends to vent the soil gases out the exhaust instead of into the house. Once you install it, you should do more testing to see that it was effective. In fact, you should periodically retest and inspect the blower, too. The EPA suggests testing every two years.
As you can see in the Irish EPA video below, you can also increase ventilation under the house in other ways. It all depends on how much of a problem you have and exactly how your house is built.
DIY?
If you are reasonably handy, you could install it yourself, although there are a few nuances that may cause you to turn to a professional. Assuming you have a typical slab, you’ll need to drill a roughly 5-inch hole through the slab and create a pit. A PVC pipe is placed in the pit with a seal. A special “radon fan” pulls the suction in that pipe and discharges it into another PVC pipe. There’s also a manometer to show the negative pressure. This tells you the fan is producing suction. It doesn’t, of course, tell you that you’ve actually reduced the radon level. That will take more testing.
Depending on your foundation, though, you need to be careful. You want to produce negative pressure everywhere, not just at the location of the pit. For dense soil, you may need more than one suction point. You also need the right fan and to ensure nothing leaks back into the house.
The good news is that a typical install isn’t terribly expensive, often around $1,000 or so. Also, depending on your situation, you may legally need a pro to at least certify that your system is working, or they may prevent you from doing it yourself. Check your local laws.
While a pro may be better suited to mitigating radon, you can do your own testing in your preferred style.