1080-p

lily0508

New member
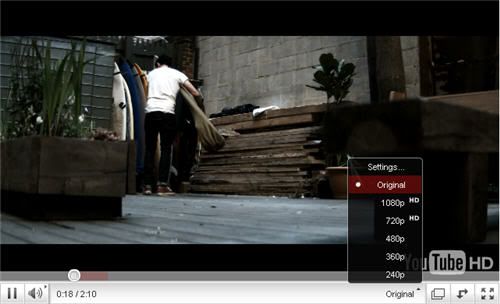
So you've got an iPad with an "HD" 1,024 by 768 pixel screen, the screen is in a 4:3 ratio which is the exactly the same as an old CRT television set. Many of us are having gone on from there and are luxuriating in the glory of our 16x9 aspect HD videos. It turns out that 16x9 will give you big honking black bars at the top and bottom of your screen as you can see by the green bar in the image below, and anything above or below it will be displayed as black bars.
ipad-1080p-720p.jpg


Actually, if you have a boatload of 1080P HD video files on your computer, iPad can't play them - and, iTunes won't even let you copy them to the iPad! The easiest solution is to download or convert 1080P HD video to 720P video using HD Video Converter supplied by iFunia. Here is a tutorial will show you a really easy solution to convert 1080P HD videos(.MTS, .M2TS, .MKV) to iPad with HD Video Converter from iFunia in full screen for great enjoyment.

3 simple steps to convert 1080P HD files to 720P for playing on iPad
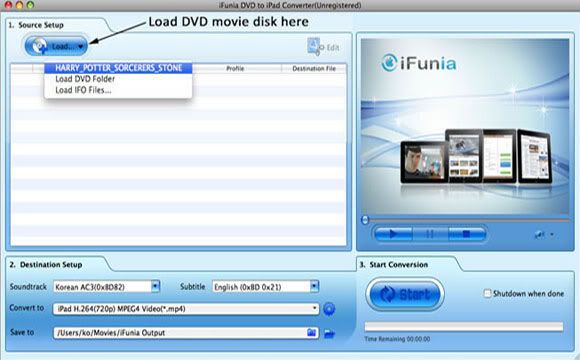
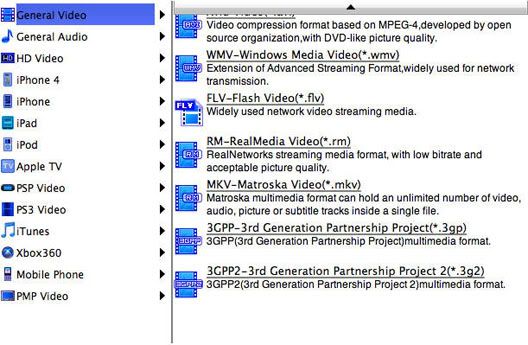
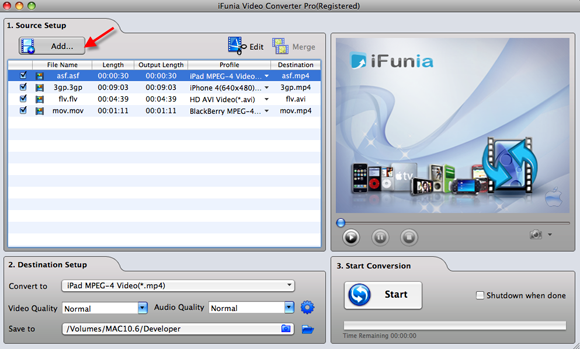
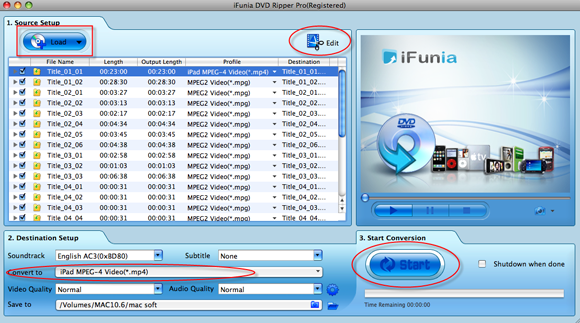
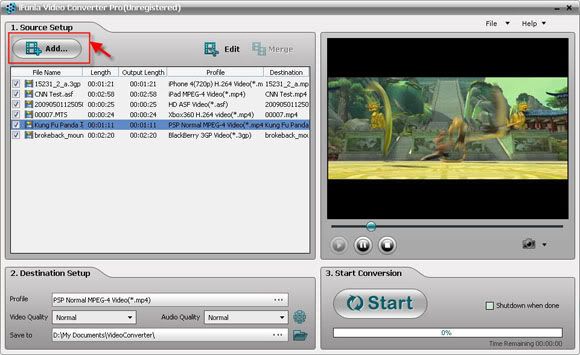
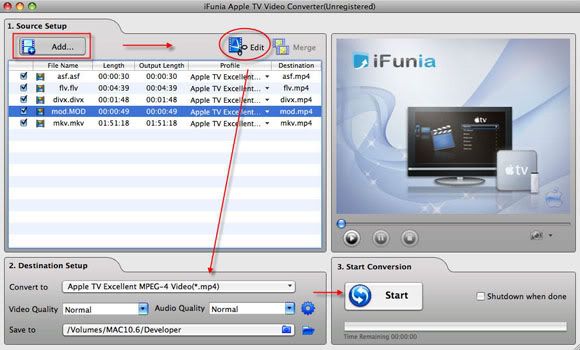
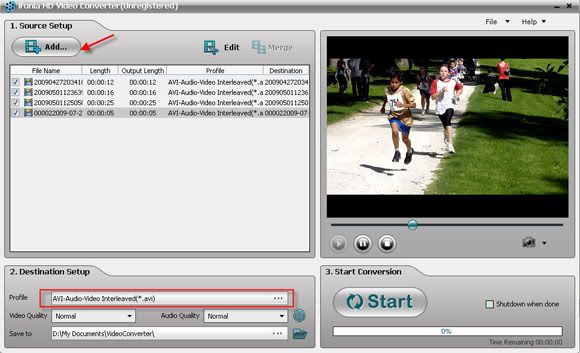
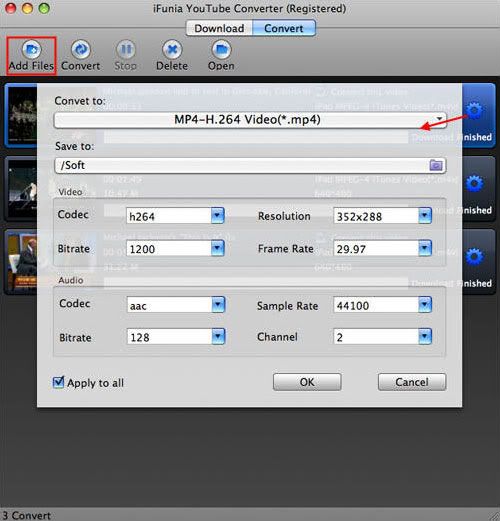
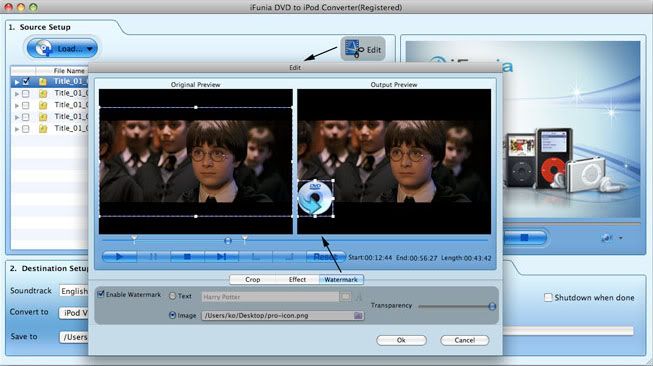
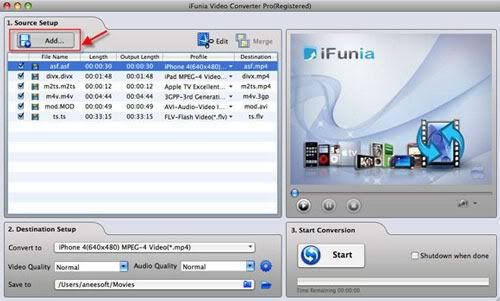
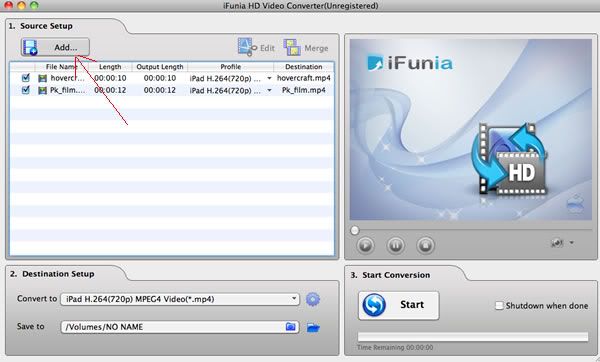
Step 1: "Add" 1080P HD (.mts, .m2ts, .mkv ) files to iFunia HD video converter.
1080p-hd-720p-ipad-add.jpg


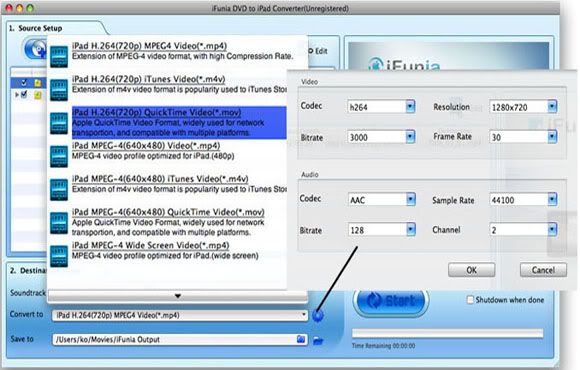
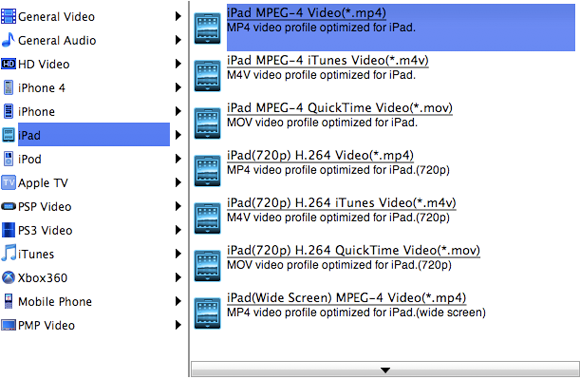
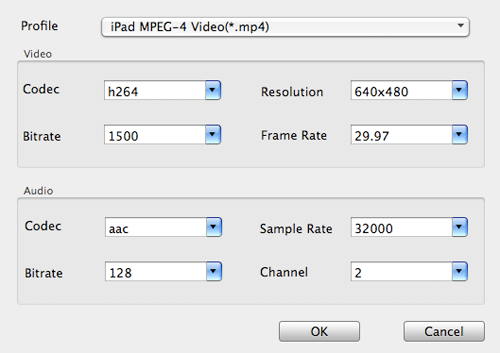
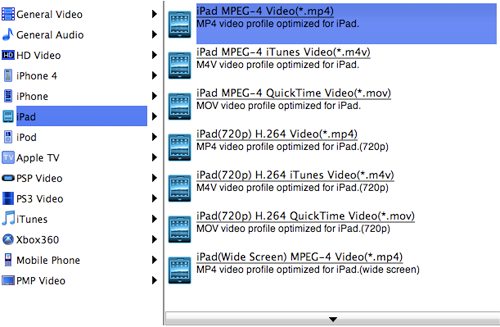
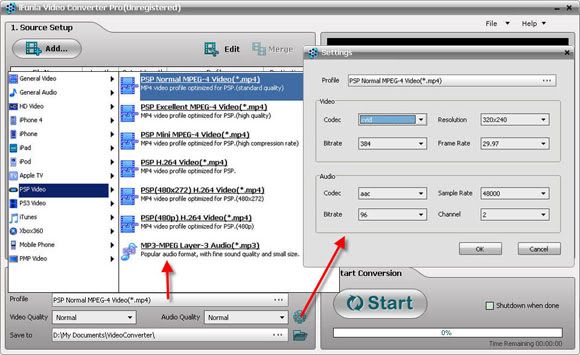
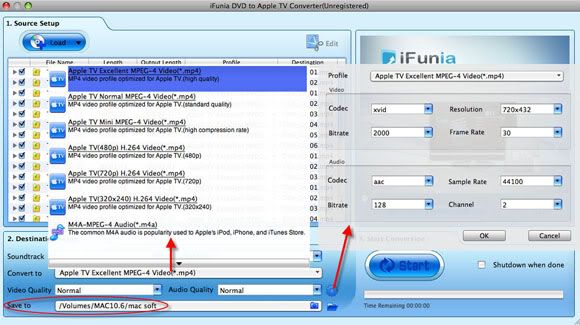
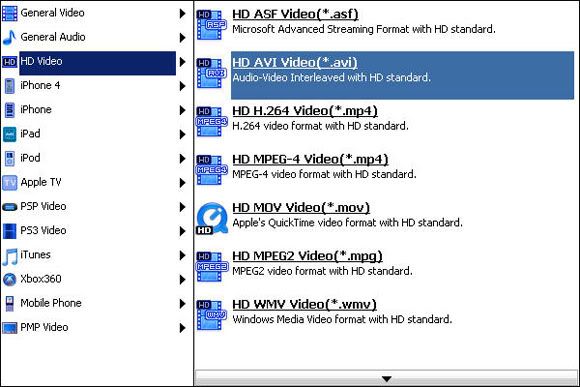
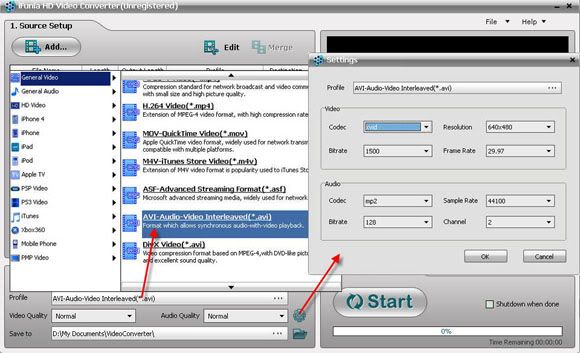
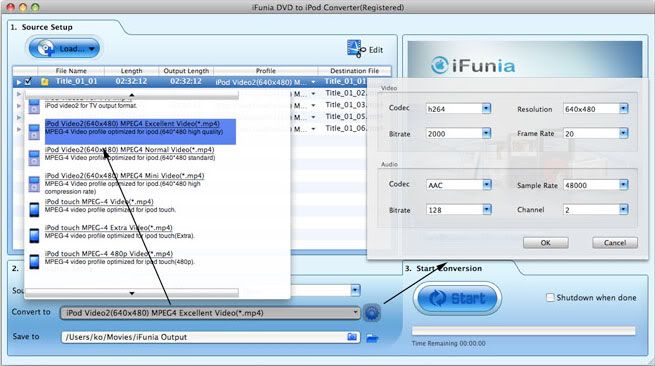
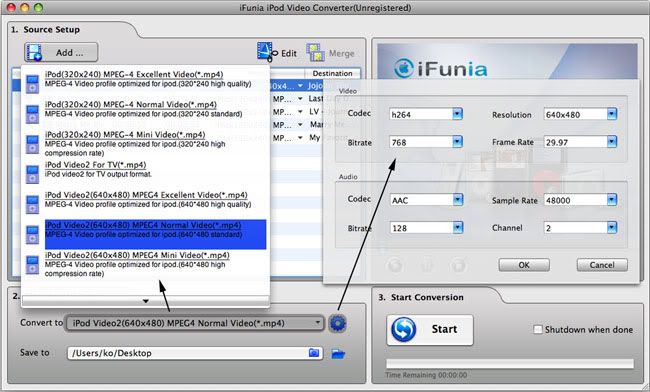
Step 2: Choose H.264 720P MP4 format for iPad
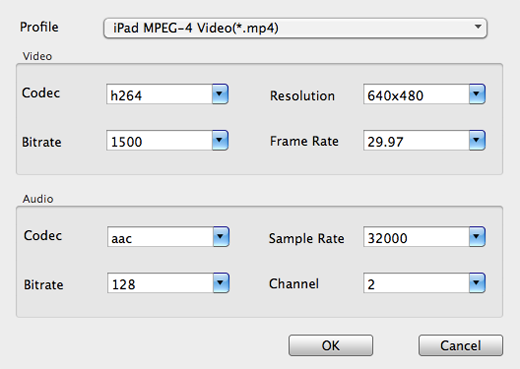
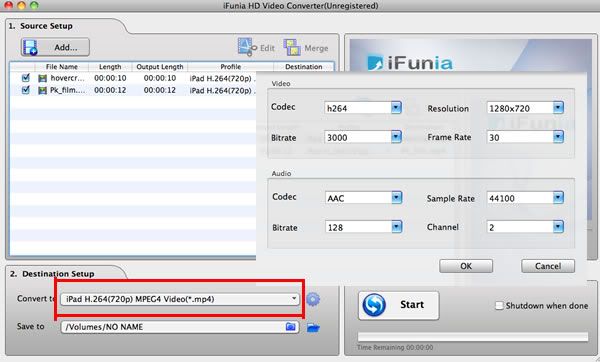
We all know the iPad can only play back H.264 MPEG4 (.mp4) files, choose H.264 720P MP4 output profile. And in the "Settings" window, all the video/audio parameters are set for playing 1080p on iPad with better quality.
1080p-hd-720p-ipad-output.jpg


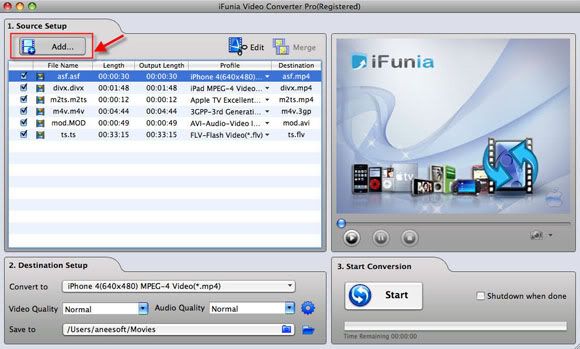
Step 3: Click the "Start" button to start conversion of 1080p, 1080i MTS/M2TS files to 720P for iPad now.
As long as the conversion is done, you will get the 720p MP4 video files in full screen from its destination folder, and then you can import the files to iTunes and sync to your iPad for playing.

Tips
* If you are a PC user and want to convert 1080P HD Videos to 720P for iPad on Windows, please turn to iFunia HD Video Converter for Windows.
* This HD Video Converter from iFunia can convert HD videos including HD AVI,HD WMV,HD MOV, H.264/AVC, AVCHD (mts, m2ts), MKV.
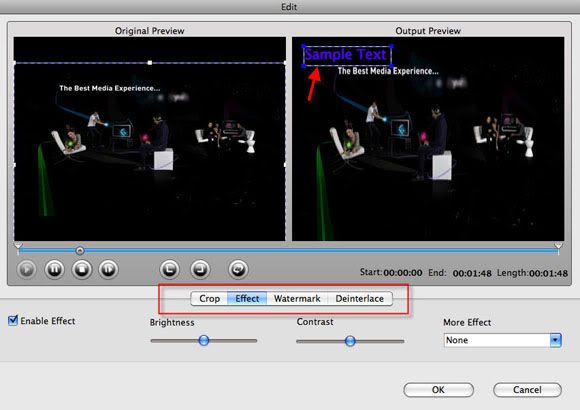
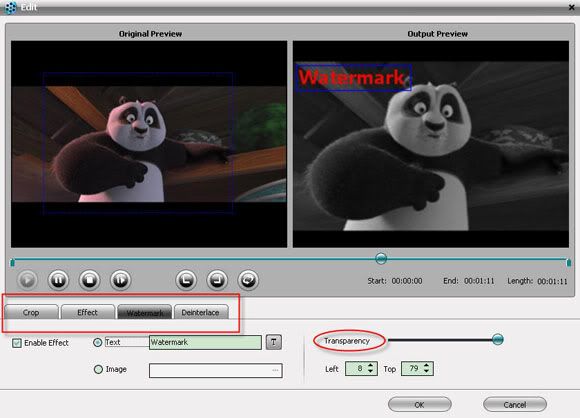
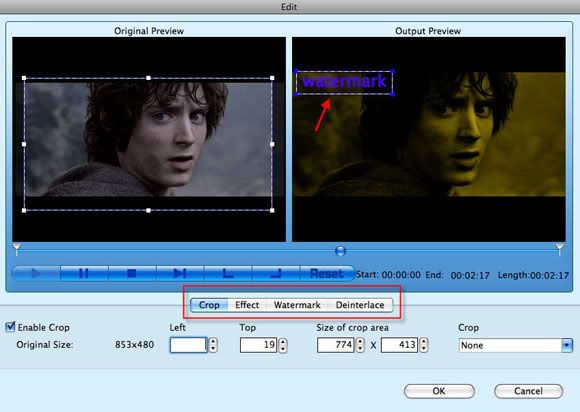
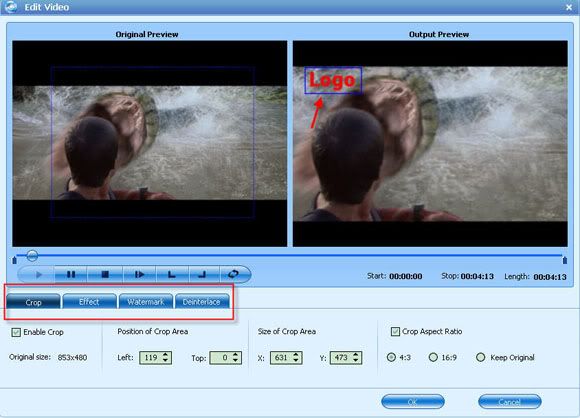
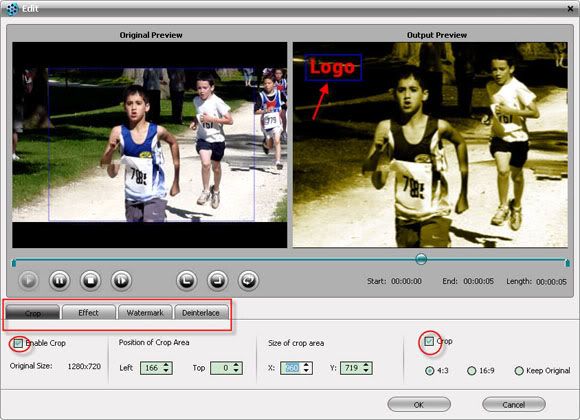
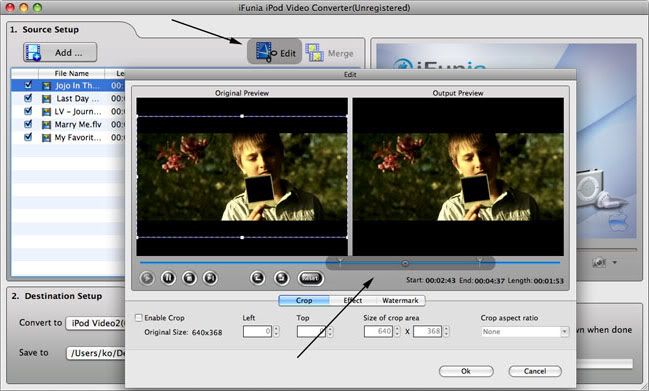
* Allows edit videos, crop, trim video and add watermark and special effects.
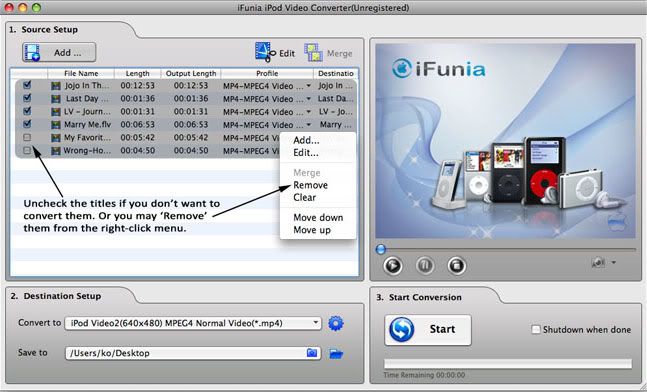
* You can merge multiple video clips into one video with iFunia HD Converter.
* Down-convert HD videos to SD video formats with iFunia HD tool.
* Batch Conversion. Save time with batch and fast speed of video conversion.
 
How to Watch DVD Movies on iPad easily with iFunia

What movie format will iPad play? How to convert a movie compatible to iPad movie format without buying the movie with iTunes.
So you just bought an iPad and want to stock it with movies from your DVD library. For both Windows and Mac users, we need a third-party software to converter DVD movies to iPad and then we can watch DVD on iPad. We're talking about ripping a movie directly from the DVD. Here is the guide will solve the problem on how to watch DVD movies on iPad for Mac users. The software we will use here is iFunia DVD to iPad Converter for Mac. You can get it from its official page. It will not only help you convert DVD movies to watch on iPad, but also let you edit the DVD and much more.

Things You Will Need
* Cool iPad
* Favourite DVD movies
* DVD to iPad Converter from iFunia
* Free storage space

What movie format will iPad play?
So, most iPad users like to watch movies on this beautiful handset. However, according to iPad's official page, there are many technical specifications as follows for iPad movie format:
Movie Format: MP4, MOV, M4V
Movie Size: up to 1280 by 720
Movie Framerate: up to 30fps
Movie Bitrate: up to 1.5Mbps for H.264, or 2.5Mbps for MPEG-4
Audio: AAC up to 160Kbps, 48 kHz

H.264: A standard for video compression; known as MPEG-4 Part 10, or MPEG-4 AVC (for Advanced Video Coding); the latest block-oriented motion-compensation-based codec standard developed by the ITU-T Video Coding Experts Group (VCEG) together with the ISO/IEC Moving Picture Experts Group (MPEG).
MPEG-4: A collection of methods defining compression of audio and visual (AV) digital data; introduced in late 1998 and designated a standard for a group of audio and video coding formats and related technology agreed upon by the ISO/IEC Moving Picture Experts Group (MPEG) under the formal standard ISO/IEC 14496; uses of MPEG-4 include compression of AV data for web (streaming media) and CD distribution, voice (telephone, videophone) and broadcast television applications.
MP4: Movie or video clip that uses MPEG-4 compression, a standard developed by the Moving Picture Experts Group (MPEG); commonly used for sharing video files on the Internet.
MOV: Common multimedia format often used for saving movies and other video files; uses a proprietary compression algorithm developed by Apple Computer; compatible with both Macintosh and Windows platforms.
M4V: MPEG-4 file extension used for videos downloaded from the Apple iTunes store; includes music videos, TV episodes, and full-length movies; similar to a .MP4 file, but may be copy-protected using Apple's FairPlay DRM copyright protection.

How to Watch DVD Movies on iPad for Mac?
It will be deadly easy for Mac users to watch DVD movies on iPad with the help of iFunia DVD to iPad Converter for Mac. This guide is easy enough to follow while you read it.

Step 1 Load movies to the DVD to iPad Converter for Mac
Now get your DVD disc and insert it. Then run iFunia DVD to iPad movie format converter on your Mac and click the big button "Load..." to load your DVD disk.
dvd-to-ipad-run-1.jpg


Step 2 Select iPad preset from output format list
In the Destination-Setup section of the interface, choose the right preset for your iPad device in the Convert-to drop-down menu. You can also change the output settings to make the video look the best on iPad. Here I set the output video format to 'iPad MPEG-4 Video (*.mp4)'.
dvd-to-ipad-output-set.jpg


Step 3 Hit Start to convert DVD for iPad to Finish
Bingo! That's it! When the conversion is done you can copy the output DVD movies to your iPad and enjoy it comfortably on a cozy sofa! This professional DVD to iPad Converter for Mac from iFunia is specially design for Apple iPad, aiming to enable iPad users an exquisite experience of viewing DVD movies on your iPad’s widescreen.


Tips
* If you are a PC user, please refer to iFunia DVD to iPad Converter for Windows.
* Output setting. In the settings window, the parametres of movie going to be gennerated will be set automatically according to iPad's video requirements. However, you can access more configurations and change them if you like to customize the iPad movie.
* This DVD to iPad Converter from ifunia allows edit videos, crop, trim video and add watermark and special effects.
* Batch Conversion. Save time with batch and fast speed of video conversion.
 
How to convert video to MP4, AVI, FLV, 3GP, WMV, MOV…on MAC

I got some favourite videos and would like to watch them on my phone everytime eveywhere on the go. But the videos I downloaded are .FLV video format which could not be supported by my phone. I would like to find a video converter to convert FLV to 3GP videos. Do you have the same conversion problem too? Maybe you got lots of video and would like to import them into Windows Movie Maker for editing. But the videos downloaded are .MKV video format which could not be supported by Windows Movie Maker, then you need to convert the MKV to WMV videos first; or you got some AVCHD videos by HD camera, and just wanna upload them to YouTube for sharing, but found that YouTube only support several video formats, this time you may need to convert the AVCHD to FLV files for uploading.

Nowadays, people have so many kinds of portable music/video players, and they play different video formats, so how to convert video from one popular video format to another is a question. Now I will give you a excellent All-in-one video converter: iFunia Video Converter Pro that can do all popular formats conversion in few clicks. The process is relatively simple, so even if you are not technically savvy, you should be able to convert all popular video formats to MP4, AVI, FLV, 3GP, WMV, MOV…on MAC without an issue. Well, read on.

Step1. Download and install iFunia Video Converter Pro
Download the All-in-one video converter from iFunia homepage or download sites, and install it on MAC.

Step2. Add video files to the converting program
Run the program iFunia Video Converter Pro on your Mac and click the button "Add.." to add video files, you may add as many videos as you want for batch conversion.
videopro_add.jpg


Step3. (Optional) Edit videos: crop, trim, add effects, add watermark
This step is optional step. But when you come to review the video your taken and find it's too dark or the focus is blurred, you may wanna fix these flaws and apply artistic effects with the Edit Video module of the program. Plus, with just a few clicks, you can crop the video to remove black sides, trim the video and add text or image watermark easily as below.
videopro_edit.jpg


Step4. Set the output formats and other settings
From the "Convert to" drop-down list select output format for each video file and specify a directory on your computer to save the output files. Remember that the output file size mostly depends on the Bitrate you set. Larger Bitrate, larger file size. Actually video with bitrate as 768 is acceptable for watching.
videopro_output.jpg


Step5. Start the converting
After all the preset done, you may click the big button "Start" to begin converting videos to MP4, AVI, FLV, 3GP, WMV, MOV that which one you need. The convert progress bar shows you how much of the encoding is completed. The encoding time will depend on several variables including: the duration of the video file, the speed of your computer, what other activity your computer is currently doing and the bitrate you set.

Tips
* You can preview the video by selecting the video and clicking Play in the preview pane. You can also take snapshot and save them as jpg, bmp file while preview.
* Supports Mac OS X 10.5 Leopard and Mac OS X 10.6 Snow Leopard on iMac, Mac Pro, MacBook, MacBook Pro, MacBook Air, etc.
* If you are a PC user, please just refer to iFunia Video Converter Pro for Windows.
 
How to convert video and DVD movies to iPad or iPhone 4 on MAC

If you got a bunch of videos from HD camera or somewhere, or numbers of favourite DVD movies and want to watch them free on the go, what should you do? Just stored or buy the DVDs from iTunes again? Well, with the portable device player flourishing developing on the market, you can just put the videos and DVD movies on them and playback as desired. The new released iPad, with 9.7-inch LED-backlit glossy widescreen display, 1024-by-768-piexl resolution, the HD feature makes watching DVD movies an utterly new experience. As well as iPhone 4, thanks to the Retina display, it's pixel density is so high, your eye is unable to distinguish individual pixels. And the remarkable 960x640 resolution screen of iPhone 4 will make your movie watching experience unbelievably sharp and crisp. So it’s wise to convert the videos and kinds of DVD movies to your new iPad or iPhone 4 for entertainment. To help Mac users watching videos and DVD movies on iPad or iPhone 4, this article will focus on this point to show you a solution on how to convert, rip videos and DVD movies to iPad or iPhone 4 on Mac OS. Just read on to find this step-by-step tutorial from the following contents.

What You Will Need
* Bunch of videos or DVD movies
* iFunia MediaConverter Bundle
* iTunes

Step-by-step guide: how to convert video to iPad or iPhone 4 on Mac OS

Step1. Add video to convert
Download iFunia MediaConverter Bundle and run the Video Converter Pro, click Add…button to select and open the video file you wish to convert. iFunia MAC Video Converter Pro is an all-in-one MAC video converter, a groundbreaking Mac video format converter you can use to convert video of all popular formats like AVI, WMV, AVCHD, MKV, FLV, H.264/AVC, MP4, MOV, 3GP,etc. for playback on iPad, iPhone 4, iPod, Apple TV and other portable devices.
videoconvertpro_add.png


Step2. Select an output format
In the Destination-Setup section of the interface, choose the right preset for your iPad or iPhone 4 devices in the Convert-to drop-down menu.
videoconvertpro_output.png


Step3. Adjust audio and video parameters
In the Convert to settings, you can get the following window will pop up. This iFunia Mac Video Converter Pro allows users adjusting video and audio parameters like codec name, aspect ratio, bit rate, frame rate, sample rate and audio channels to optimize the playback quality on iPad or iPhone 4.
videoconvertpro_output2.png


Please notice that the parameters you changed should not be out of the format restrictions of iPad and iPhone 4, otherwise, the output files may not playable. Following are iPad and iPhone 4 all Supported following Video Format.

* H.264 video (up to 720p, 30 frames per second; main profile level 3.1 with AAC-LC audio up to 160 Kbps, 48kHz, stereo audio in .m4v, .mp4, and .mov file formats)
* MPEG-4 video, up to 2.5 Mbps, 640 by 480 pixels, 30 frames per second, Simple Profile with AAC-LC audio up to 160 Kbps, 48kHz, stereo audio in .m4v, .mp4, and .mov file formats.
* Motion JPEG (M-JPEG) up to 35 Mbps, 1280 by 720 pixels, 30 frames per second, audio in ulaw, PCM stereo audio in .avi file format.

Step4. Click the “Start” button to start conversion on OS X
Bingo! That’s it! When the conversion is done you can transfer the video to your iPad or iPhone 4 via iTunes and enjoy it anytime and everywhere!

Steps on ripping DVD movies to iPad or iPhone 4
The steps on ripping DVD movies are similar to convert videos. First, run the DVD Ripper Pro from the iFunia MediaConverter Bundle, and click the "Load..." button to load IFO files. Next preset the output settings, adjust wanted parameters and then click "Start" button to start the ripping.
dvdripperpro.png


After all are done, you just get the wanted DVD movies on MAC, and sync them to your iPad or iPhone 4 for playback on-the-go!

Additional tips:
* iFunia MediaConverter Bundle allows you convert HD videos and rip DVD movies to all popular formats.
* Batch conversion. Convert multiple videos in one pass to save time.
* Save video and DVD movies for iPad, iPhone 4, iPhone 3G(S), Apple TV, PSP, Zune, Archos, BlackBerry, cell phone and more.
* You can join multiple video files to create a single movie via merge the video files.
* You can do simple editing like trimming, cropping, adding special effects, watermark to video and deinterlace video by clicking "Edit". Real-time preview provided while editing.
* You can preview the video by selecting the video and clicking Play in the preview pane. You can also take snapshot and save them as jpg, bmp file while preview.
 
Download and convert YouTube videos on MAC

YouTube is pretty much the one stop shop for videos online. In case you are interested in downloading YouTube videos to your Mac computer so that you can play them on iPad or iPhone 4 or some other portable devices.
"I'd like to download some YouTube videos to my phone. I use a Firefix extention to download .flv files, but I can't use them. All the converters I googled were Windows only. I'd also love to convert YouTube flv to MP4 on Mac." Does anyone have the same problem as me? Wanna download and convert YouTube videos to other format? Well, I found a very good tool called iFunia YouTube converter to make it easily! Now, I'd like to share some simple practical tips which I collated on the course. The steps listed below will help you quickly and easily get the favourite YouTube videos and convert to other formats on your Mac OS.

Things You Will Need
* A Mac computer
* iFunia YouTube Converter for MAC
* Network and portable player
* Favourite YouTube videos

Step 1. Download and run iFunia YouTube Converter for Mac
Download the YouTube Converter for MAC from iFunia and install it on MAC. Now run the program on your Mac. It's really easy to use yet powerful. You may use iFunia YouTube Converter to download any favourite videos from YouTube as many as you want.

Step 2. Add video URLs to download videos from YouTube
In the "Download" channel, there is the field for a Video URL, the field for an output path. Simply copy-n-paste a YouTube or Google URL to the Video URL field. The URL looks like: YouTube - Serious Frog Jumpin' in Calaveras County. You can batch download multiple videos by adding multiple YouTube video URLs. And then specify a directory on your computer to save the output FLV files.
Youtubeadd-download.jpg


Step 3. Open YouTube FLV video files to convert and select output profile
After downloading the YouTube videos, then switch to "Convert" channel, in the program's main window click "Add..." button on the toolbar to add FLV videos that you want to convert to the needed compatible video formats. Select the output profile in "Convert to" from the dropdown menu in the lower part of the window.
youtubeconverter_output1.jpg


Youtubeconverter_output2.png


Step 4. Convert YouTube *.flv videos
Finally, click the big "Convert" button to start converting YouTube FLV videos. You also can batch convert multiple videos.

YouTube video Technology
YouTube uses Adobe Flash Video technology to display a wide variety of user-generated video content, including movie clips, TV clips, and music videos. Viewing YouTube videos on a personal computer requires the Adobe Flash Player plug-in to be installed in the browser.
In January 2010, YouTube launched an experimental version of the site that uses the built-in multimedia capabilities of web browsers supporting the HTML5 standard. This allows videos to be viewed without requiring Adobe Flash Player or any other plug-in to be installed. The YouTube site has a page that allows supported browsers to opt in to the HTML5 trial. Only browsers that support HTML5 Video using the H.264 or WebM formats can play the videos, and not all videos on the site are available. So one of the best options for enjoying YouTube videos is download and convert them to the needed formats, then playback on iPad, iPhone 4, PSP, or some other portable devices on-the-go.

Tips
* The iFunia YouTube Converter will switch to "Convert" channel after downloading the videos automaticly.
* This YouTube Converter from iFunia enable you to download and convert YouTube videos to a wide arrange of video formats including MP4, M4A, MOV, MP3, etc, enable them to be played on iPad, iPhone(iPhone 4), iPod, Apple TV or Quick Time Player.
* Doubles as a YouTube HD video downloader and converter. It helps you download and convert YouTube HD video to HD MP4, HD MOV, HD AVI and more.
* Allows you extract soundtracks from online videos.
* Save time by downloading or converting multiple videos at the same time.
 
Convert video to playback on iPad, iPhone 4, iPod, Apple TV, PSP, Creative ZEN, Zune, Bl

Got a ton of videos files from YouTube or taken by camera and want to watch them on your portable video player? Or maybe you'll have one of this problems, want to watch videos in different formats on iPad? Don’t know how to convert/transfer/put/import videos to iPad? You have a Sony PSP and would like to watch your favorite home video using it? But you do not know how to convert your files into PSP compatible format? Get a blackberry models, want to enjoy some videos on the trip, but find that although all current BlackBerry models support video playback, format restrictions make it very hard to get your videos onto the device. iFunia Video Converter Pro for Windows, designed as an all-in-one video converter for Windows with ready-made presets for converting to popular video/audio formats and support changing video formats for Sony’s PSP and PS3, Apple’s iPad, iPhone(iPhone 4), iPod and Apple TV, the BlackBerry, Xbox 360 and other portable players, enables you to transfer your home video library to a necessary format with a few mouse clicks.

What you will need:
1. A portable device capable of video playback
2. iFunia Video Converter Pro for Windows
3. Favourite video files want to convert

Just follow the step-by-step guide to convert your video to playback on iPad, iPhone 4, iPod, Apple TV, PSP, Creative ZEN, Zune, Blackberry...
Step1. Download and install iFunia Video Converter Pro
Download the video converter pro from iFunia homepage or downloadatoz.com. After the download is finished, run the ifunia-video-converter-pro.exe file and follow the installation wizard instructions.

Step2. Run iFunia Video Converter Pro for Windows and Add your input video file
Now run the iFunia Video Converter Pro and click the big button "Add..." to add videos from your hard disk, you may add as many videos as you want to convert to needed videos for watching on portable video player. Only the titles you checked will be converted.
videoPro_add-1.jpg


Step3. Edit & merge videos: trim, crop, add effect, add watermark and deinterlace
Wanna edit your videos to make it more personalized? You may add a watermark in iFunia Video Converter Pro for Windows. Just select the title you'd like to add watermark, then click the button 'Edit' to launch video editing window. If you want to crop video or add some special effects, click the first two tabs. And you also can do deinterlace the videos.
videoPro_edit-1.jpg


Step4. Set up output settings and the conversion parameters
Set the output setting as your wish, from the "Convert to" drop-down list, choose a wanted output format , you'll find a wide range of preset video setting options available. And adjust the Resolution, Bitrates, Frame Rate and Audio Codec in section Export Settings. Then go to "Save to" to set the output directory.
videoPro_output-1.jpg


Step5. Start the video conversion
Finally, click the big "Start" button to start converting videos, the conversion will take some time. If you don't want to wait around during the conversion, just check "Shutdown when done".

Tips
* Allows preview original video and fixed video in real-time while editing.
* If needed, can merge all clips from a conversion batch into one movie for easy sharing on YouTube.
* After conversion, you can sync the videos to iPad, iPhone 4, Apple TV, iPod via iTunes, or transfer the videos to ZEN, Zune or Blackberry.
* If you are a MAC user, please just refer to iFunia Video Converter Pro for MAC.
 
Convert DVD movies or video to Apple TV on MAC

Let’s say you’ve purchased a movie on DVD, and you want to watch it on your Apple TV. You could buy a computer-friendly copy from the iTunes Store—if it’s available, that is. Or you could download batch videos from internet, you get many videos such as MKV, AVI from your friend. You want to play the videos on Apple TV. However, Apple doesn't exactly make it simple to watch content that's not purchased from iTunes, and the Apple TV was clearly meant to be an iTunes portal for the living room. The Apple TV's spec page indicates that it supports a very limited number of file formats: anything from the iTunes store, H.264/AVC movies, and MPEG-4 video. For the average user, these will likely be fine, and it's not hard encoding one's own movies to fit one of these formats.

Here, we are writing about how to rip DVDs and convert other video files into formats that will play on Apple TV in the help of iFunia DVD to Apple TV converter and Apple TV Video Converter, then you can enjoy from the comfort of your couch in the best possible quality.

How to rip or convert DVD to Apple TV on Mac?
There are plenty of converters you can find can do the conversion for Apple TV on the market, but the quality different. We’ll be using the very nice professional Apple TV converter called iFunia DVD to Apple TV converter, compared to others, this soft has rapid conversion speed, high output quality, what's more, it is quite easy to use, to a novice, and this is the most suitable converter. It is positioned specifically as a simple, "one button" converter for Apple's devices that sync with iTunes: the video Apple TV.

Step1. Get iFunia DVD to Apple TV converter and Load DVD files
Download iFunia DVD to Apple TV converter and run it on MAC. In the program main panel, click the button "Load..." to load your DVD movie, you may see the name of DVD movie disk if you insert DVD before running this DVD ripper tool. A movie DVD usually has several titles, just select the titles you would like to convert.
DVD-AppleTV_load.jpg


Step2. Select output format and set up the conversion parameters
In "Destination Setup" you can use the "convert to" drop-down menu to control the output format. Select Apple TV MP4 output format and adjust the Resolution, Bitrates, Frame Rate and Audio Codec in section Export Settings. Then go to "Save to" to specify a directory on MAC to save the output files.
DVD-AppleTV_output.jpg


Remember that the output file size mostly depends on the Bitrate you set. Larger Bitrate, larger file size.

Step3. Start DVD to Apple TV MP4 conversion
Finally, convert your DVD to Apple TV MP4 by hitting the Start button. Tick "Shutdown when done" check box - if needed. The convert progress bar shows you how much of the encoding is completed. The encoding time will depend on several variables including: the duration of the video file, the speed of your computer, what other activity your computer is currently doing and the bitrate you set.

Steps on converting video files to Apple TV on MAC
The steps on converting video files to Apple TV on MAC are similar to rip DVD movies. First, run the iFunia Apple TV Converter, and click the "Add..." button to add video files. Next preset the output settings, adjust wanted parameters and then click "Start" button to start the ripping.
AppleTVconvertermac.jpg


Optional step. Edit videos: crop, trim, add special effects or add watermark and deinterlace
Wanna add a personalized watermark on the output video files? iFunia DVD to Apple TV and Apple TV converter both allow you add a text watermark or a image logo. Just select the titles/chapters you'd like to add watermark, then click the button 'Edit' to open video editing window. If you want to crop DVD movies or video files and add some special effects, click the first two tabs.
DVD-AppleTV_edit.jpg


After all are done, you just get the wanted DVD movies or video files on MAC, and sync them to your Apple TV for playback on-the-go!

Tips&Tricks
* Batch conversion. iFunia DVD to Apple TV Converter and Apple TV Converter both can convert multiple videos to Apple TV compatible format in one pass to save time.
* HD video conversion. The two programs also can rip HD DVD and HD video to watch them on your wide screen HDTV.
* iFunia Apple TV Converter also can convert AVCHD (M2TS, MTS), MOD to Apple TV MP4 video format.
* You can built-in DVD player or preview the video by selecting the video and clicking Play in the preview pane with this two iFunia Apple TV converter. You can also take snapshot and save them as jpg, bmp file while preview.
* If you are a PC user, please just refer to iFunia DVD to Apple TV Converter and Apple TV Video Converter for Windows.
 
Rip and convert DVD movies to all popular videos for playback on-the-go

"I am looking for a program to convert DVD to AVI or WMV or other formats for web use. What would be the best recommendation?"
Got tons of DVD movies and want to rip your DVD movies to AVI or other formats? Want to rip DVD movies to your portable devices like iPad, iPhone 4, Apple TV, Zune, PSP and a lot more other mobile devices, so that you can enjoy movies without any limits? Well, as DVDs are high quality and you can rip them to your PC, they do have drawbacks, such as large file sizes(4-9 Gigabytes per movie) and obscure file-naming. By ripping a DVD to an AVI or other file, you benefit from small and portable file sizes, your own file naming. Also, the files can be used for video editing. This tutorial will teach you how to make a nearly identical DVD ripping with iFunia DVD ripper Pro for Windows that you can archive and play in your set top DVD player or iPad, iPhone 4, Apple TV, Zune, BlackBerry and so on portable player devices.

Necessary Preparation
* DVD movies
* iFunia DVD Ripper Pro for Windows
* Portable movies player

DVD video info
The video on DVDs is in a special format called mpeg2, sort of similar to mp3 for audio files. Mpeg2 makes video files small enough to fit on DVDs (they are actually even bigger than these very large DVD files. Before we can deal directly with the video information, DVD's have a number of copy prevention mechanisms. When you rip the DVD you strip off those mechanisms, but copy the rest of the video unadulterated. This means that the ripped DVD will take up as much space as the files on the DVD itself. In order to successfully complete this process, you need to have a minimum of 5 gigs free after you copy the DVD(s) to your hard drive. Unless you run out of free hard drive space, you can keep ripping DVDs to hard drive.

How to rip and convert DVD movies to all popular videos step by step
Step1. Run the DVD Ripper Pro for Windows program and load DVD files
Launch iFunia DVD Ripper Pro for Windows to load DVD files: Click "Load..." to find the DVD disc you want to convert. You also can load DVD/IFO from your hard disk.
DVDripperproWin_load.jpg


Step2. Edit videos: crop, trim, add special effects or add watermark
iFunia DVD Ripper Pro for Windows can not only rip DVD but also a best dvd ripper enables you to copy DVD to avi video and almost all other video and audio formats, plus, it is a video editing program:
Crop – Set the video zoom to 16:9/4:3/full screen.
Effect – Make special effect through brightness, contrast, saturation, built-in effects.
Watermark – Add text or pictures on the video.
Deinterlace – Remove the movies black area.
DVDripperproWin_edit.jpg


Step3. Change the output settings to convert videos with best quality
In the Destination-Setup section of the interface, select AVI format or other format from the profile dropdown list. If you want to put the DVD movies to playback on your iPad, iPhone 4, Apple TV, Zune, PSP or other popular portable device, just select an output format according to your device name.
DVDripperproWin_output.jpg


Step4. Start ripping
Click the big button "Start" to begin converting DVD movies onto your hard disk. The Convert progress bar shows you how much of the convert process is completed. Please note the ripping time will depend on several variables including: the duration of the video file, the speed of your computer, what other activity your computer is currently doing, the codec you selected (H264 or MP4) and the bitrate you set.

Tips:
1. HD video ripping. iFunia DVD Ripper Pro for Windows also can rip DVD to HD video such as HD MOV, HD FLV, HD AVI, etc.
2. You can adjust settings for channel, bitrates, brightness, contrast, and more in the in section Export Settings
3. If you want to cancel the converting process, just click "stop" button to do this.
4. If you are a MAC user, please refer to iFunia DVD Ripper Pro for MAC.

Warning: Ripping DVDs that do not belong to you is illegal!
 
How to convert AVCHD to iPad, iphone 4, iPod, Apple TV, PSP, PS3, BlackBerry... etc. on

AVCHD is a high definition (HD) digital video camera recorder format recording 1080i and 720p signals onto MiniDVD discs, MiniDV tape, Hard Drive, and digital camera Memory Cards. AVCHD recordings made on MiniDVD discs can be played back on some Blu-ray disc players, however, AVCHD with a .M2TS and .MTS file extension cannot be played back on standard DVD players and most portable players.
As a Sony AVCHD camcorder user, I’d like to share my experience about how to convert AVCHD videos to standard video such as avi, mp4, flv videos, so you can play the converted AVCHD videos on Computer, iPad, iPhone 4, iPod, Zune, PSP etc, or even upload AVCHD videos to YouTube and share with your friends. This article consists of the following three parts.
Part I. How much do you know about AVCHD video?
Part II. Why convert AVCHD video to standard Video formats such as AVI, MP4?
Part III. How to Convert AVCHD video to popular video and play on iPad, iPhone, PSP?

Part I. How much do you know about AVCHD video?
AVCHD is short for “Advanced Video Codec High Definition”, it is the newest HD format to be released for inexpensive HD video production. And AVCHD (AVC-HD, AVC HD) video is recorded by AVCHD camcorder such as Canon VIXIA HG20, Sony HDR-UX5, and Panasonic HDC-SD1 etc using the MPEG-4 AVC/H.264 video compression codec.
AVCHDLiteLogo.gif


AVCHD Videos usually memory on recordable DVD discs, memory cards and hard disk drives. And AVCHD specification support all three high definition formats: 1080i, 1080p and 720p.

Part II. Why convert AVCHD video to standard Video formats such as AVI, MP4?
If someone used to have AVC HD videos, he would be frustrated that there are so little devices which support AVCHD video. Normally, you can only play your AVCHD videos directly from a camcorder on a HDTV with a HDMI, or burned onto DVD disc, then played from most Blu-ray Disc player, or on a computer, playing from the camcorder connected via USB as an external storage device.

However, have you imagined playing your AVCHD videos on your PC, laptop, iPad, iPhone, iPod, Zune PSP or any other portable mp4 players? Or even uploading your AVCHD videos to YouTube, MySpace, Facebook etc to share with all of your friends?

In order to find out a workable method to do that, I have searched relate questions on Google. Finally, I got an answer which certainly can do that – Convert AVCHD files to standard video formats such as avi, mp4, mpg, wmv, flv…etc. So that you can put the converted AVCHD videos to your iPad, iPhone, iPod, Zune, PSP etc or even upload it to YouTube. And the key step to do that is to use AVCHD video converter.

Part III. How to Convert AVCHD video to popular video and play on iPad, iPhone, PSP?
Here I take iFunia AVCHD Video Converter as an example to show you the step-by-step guide to convert AVCHD videos to popular video formats such as convert AVCHD Video to avi, convert AVCHD Video to mp4, convert AVCHD Video to wmv, convert AVCHD Video to flv …etc.

Step1. Get AVCHD files off HD camcorder to Mac
Connect the AVCHD camcorders to your MAC with cable(USB/WiFi). Select mode of camcorder such as PC/Computer mode. It is desirable that you copy the videos to your MAC's hard-drive before converting or editing it. iMovie will automatically detect when you have a FireWire camcorder connected. If you see the message No Camera Attached, make sure your camera is turned on and properly plugged in to your computer via a FireWire cable and that your camcorder is set to VCR, VTR, or Play mode.

Step2. Download iFunia AVCHD Video Converter
Here we use iFunia AVCHD Converter to show the AVCHD video conversion process. In addition, this AVCHD Converter also can convert hd (high definition) videos such as mts, m2ts, tod, ts, mod to standard videos including avi, mp4, wmv, flv, mpeg, rm etc.
You can download free trial Version here: iFunia AVCHD Converter, then install and run this program on your MAC.

Step3. AVCHD videos source setup
In the iFunia AVCHD Converter main panel, click the "Add..." button to select AVCHD video files from your computer hard disc. Batch conversion is supported by this AVCHD converter, so you can load several AVCHD files at one time. Here you can also preview AVCHD video files and take snapshots.
AVCHDMAC_load.png


Step4. Customize output Settings
After you finishing video source setup, you can now select an output profile in the drop-down box, here we select iPad MP4 as output format, so you can put the converted AVCHD video on your iPad. And remember to specify a directory on your MAC to save the output files.
AVCHDMAC_output.jpg


There are various format/bit rate/screen resolution options in the Setting window. Different file formats result in different video compression rates. Bit rate refers to the number of bits processed per unit of time, the larger the number, the more bits processed and the better the quality. Resolution refers to the number of pixels handled by the device display.
AVCHDMAC_set.png


Step5. Start the conversion
Finally, click the "Start" button. The Progress bar shows the status of the converting task. The program will prompt you when the converting task is completed, then click OK.

Step6. Copy the converted AVCHD video to your iPad and enjoy it.
Connect your iPad with your MAC via iTunes, copy the converted AVCHD video (iPad Video MPEG-4) to your iPad, so you can enjoy the AVCHD video on the go.

Tips:
* This AVCHD Converter for Mac fully supports Mac OS X 10.5 or later.
* iFunia AVCHD Converter allows you to manually set video resolution, bite rate, codec and frame rate to get perfect output videos. To set that please follow step 4.
* iFunia AVCHD Converter is also a light-weight AVCHD editor. It offers you simple video editings like cropping / trimming video, adding watermark and special effects, including deinterlace to remove the movies black area.
* This program can merge all clips from a conversion batch into one movie for easy sharing on YouTube or iTunes.
* It supports AVCHD footage from various AVCHD camcorders or DVs like Canon Cameras, Panasonic Cameras, Sony Camcorders, JVC Camcorders, etc.
 
How to use iFunia M2TS converter to convert MT2S video to AVI, MOV, WMV, MP4, FLV, etc.

This article is about .M2TS which is commonly used for high-definition video on Blue-Ray Disc and AVCHD. After reading this article, you will know what’s M2TS? How to play M2TS files? How to convert M2TS to mainstream video format AVI, MP4, WMV, MOV, FLV etc.

What is M2TS?
A .M2TS file is a Sony high definition video file type. M2TS files are raw AVCHD videos recorded using Sony's camcorders, such as the HDR-SR1 and HDR-SR5 models. Panasonic, Canon and other brands of AVCHD camcorders also record in M2TS format.
Currently, M2TS files can be played using the Picture Motion Browser, which is an application video player provided with Sony AVCHD camcorders. M2TS files can also be played with Mplayer, Windows Media Player and other media players if there is a codec for DVD playing installed. But the file type .M2TS is not always automatically associated with the player, so it may be necessary to open it from the player. That's to say, it's not convenient to play and enjoy your M2TS video.

What's more, this format cannot be usually played on your computer or portable players. So firstly you need convert the format to the common video formats such as AVI, WMV, MP4, MOV, 3GP, FLV, SWF, DivX, XviD etc..

How to play M2TS file?
AVCHD camcorders are shipped with software designed to playback the files on your computer. Sony’s HDR-SR1 and the newer HDR-SR5 both record video in AVCHD format and they are shipped with the Picture Motion Browser, which plays back AVCHD files on most computers. If you purchased one of the Panasonic AVCHD camcorders, the included HD Writer should allow you to playback video recorded with your camcorder.

How to convert M2TS to AVI, FLV, WMV, MP4, MKV, etc.?
What software can do this and how to convert M2TS files to AVI, FLV, WMV, MP4, MPEG, etc.? To solve these problems, I find a number of related software which can convert M2TS files to popular video formats, such as iFunia M2TS Video Converter for Windows. Here, I would take iFunia M2TS Converter for Windows as an example on how to achieve the conversion.

Step1. Source Setup
Download and run iFunia M2TS Video Converter on your computer, then click the "Add..." button to browse your computer hard disc and add the .M2TS files you want to convert to the program. Batch conversion is supported by this HD video converter, so you can load several M2TS files at one time.
HDconverterwin_add.jpg


Step2. Destination Setup
After you added M2TS files, you can select AVI output format and specify a directory on your computer to save the output files. iFunia M2TS Converter also supports comprehensive video formats including MPEG, WMV, MP4, MOV, XviD, 3GP, FLV, etc. You can also change the video bitrate, size and frame rate for a desired quality or compression in the setting window below.
HDconverterwin_output.jpg


Step3. Start Conversion
Click the "Start" button to start conversion and then you can just go out for a walk or take a nap, and the conversion may have been finished when you come back : )

Optional: Edit your M2TS files
When you come to review the HD video you're taken, how often do you find it's too dark, or the focus is blurred? Now you can fix these flaws and apply artistic effects with the Edit Video module of the program. iFunia M2TS Video Converter can help you set video brightness, contrast, saturation, crop video, trim video and even merge multiple files into one single file before the conversion.
HDconverterwin_edit.jpg


Trim Video:
This M2TS Video Converter for Mac allows you to trim your video, so you can capture your favorite video clips.
Select the video you want to edit, and then click the "Edit" button on the top. A Edit window will be prompted. Click the Start Point and End point to keep your favorite parts of video in iFunia M2TS video converter.
Crop Video:
To watch your movies on your portable players in full screen, you can also remove the black edges around your video with this iFunia M2TS Video Converter. Click "Crop" tab to open the Crop Video window, and then tick the "Enable Crop" option box.
Set Effect:
If you want to adjust the video effect of your movie, you can click the Effect tab and then tick "Enable Effect" option box.
Drag each effect adjustment slider to set the video brightness and contrast. You can also choose a special effect from the Effect drop-down list to apply to your movie.
Add Watermark:
If you want to add watermark on your video, you can click Watermark tab and then tick "Enable Watermark" option box.

Tips
* iFunia M2TS Converter run well on Windows 7 and other windows version.
* It also a HD Converter, can convert between popular HD video formats, including HD AVI, AVCHD M2TS, MTS, TS, HD MOV, HD WMV, HD MP4, HD FLV, and more.
* The iFunia M2TS Converter allows down-convert HD video to standard definition.
* If you are a MAC user, please just refer to iFunia M2TS Video Converter for MAC.
 
How to download and convert YouTube 4K video

In July 2010, YouTube officially announced that it had launched a range of HD videos in the new YouTube 4K video format, which is a standard resolution for films that measures 4096x3072 pixels. This resolution is too large for watching on your Mac or iPad. So if you'd like to download and store the YouTube 4K videos on Mac or iPad, you need to convert YouTube 4K video to smaller HD video resolution first.
youtube-hd-video-4k-resolution.jpg


What is the YouTube 4K video format?
The YouTube 4K video format is a next generation standard for rendering very high quality HD video for digital cinema applications. Essentially, this YouTube 4K resolution is twice as powerful as the current 2K HD YouTube video format in digital cinemas today. The advantage of YouTube 4K HD video, aside from the even crisper detail, is that it can offer better fast-action and larger projection surface visibility.

How to download and converter YouTube 4K HD Video?
In order to enjoy 4K-resolution YouTube video on your Mac or iPad more comfortable, you need a YouTube video downloader with convert function. iFunia YouTube Converter for Mac is one that can download YouTube videos and convert them to the appropriate video format for you. The program also features a handy batch mode which allows you to download several YouTube videos at one time, making this process more efficient. Below is the step-by-step guide about how to download and convert YouTube 4K video with iFunia YouTube Converter for Mac.

Step1. Download YouTube 4K HD videos with iFunia YouTube Converter for Mac
Download the iFunia YouTube Video Converter for Mac, and open the tool. After that go to the YouTube website and select the YouTube 4K video you want to watch. Click 360P to drop-down the menu then copy the YouTube 4K video URL. Click Add button in iFunia YouTube Video Converter and paste the YouTube HD video URL. After the YouTube 4K video URLs have been added, click "Download" button and start to download the YouTube 4K videos. The download timing depends on your internet boardband.
youtube-add-download.jpg


Step2. Convert YouTube 4K Video to Mac or iPad supported format
After the YouTube 4K HD videos are downloaded completely in iFunia YouTube Video Converter for Mac, you can now convert the 4K HD videos to the Mac or iPad supported video formats that you want. The program allows you to convert 4K YouTube video to any other formats. For example, MPEG-4 is more friendly for Mac and it is also a iPad supported video format. Click the "Gear" button at the right side and change the output format you like from the "Convert to" drop-down menu list. Select the best video format for each video file and specify a directory to save the YouTube 4K HD video files. Remember that the output file size mostly depends on the Bitrate you set. Larger Bitrate, larger file size. Actually the default profile given is configured with good quality output.
convert-youtube-4k-video-output.jpg


Step3. Start converting YouTube 4K HD video
Now you may click the button "Convert" to begin converting the YouTube 4K HD video. The conversion progress bar will show you how much of the encoding is completed. The converting time will depend on several variables including: the duration of the YouTube 4K video file, the speed of your computer, what other activity your computer is currently doing, the codec you selected and the bitrate you set. Larger Bitrate, larger file size and longer converting time.

Conclusion
This professional YouTube Video Converter for Mac is specially designed for downloading and converting YouTube videos, and now you can also download and convert YouTube 4K HD videos with this handy tool. Get the free trial and starting your YouTube videos downloading now.
 
Convert or rip DVD movies to iPod easily with iFunia DVD to iPod Converter

As Steve Jobs announced on 1st Sept that an iPod touch will be Retina display, Led Flash, with this new and cool feature, enjoy movies and video on iPod touch will be an utterly new experience! Well, but iPod only support limited movie and video formats. So you'll need to convert or rip the movies to iPod touch for playing back. There are many DVD ripper tools that are capable of ripping and converting DVD movie to iPod supported video format. Many of them are general purpose toolkits that can convert almost any kind of video to almost any other popular formats. Some of them are good tools, but they make the process a bit complicated.

I recommend a Mac DVD ripping software called iFunia DVD to iPod Converter for Mac. This software is a free trial application for Mac OS X that accomplishes this task quickly and easily. It even has iPod touch preset format options to set up for different resolutions automatically. It is easy to use and converts the video in a single pass, ready for transfer and sync to your iPod.

Step1. Download, install & run iFunia DVD to iPod Converter for Mac
We’ll be using a very nice DVD Ripping tool for Mac OS called iFunia DVD to iPod Converter for Mac to rip DVD movies and convert DVDs to iPod compatible video files. Head over here and download the free trial version. Next step is to install the program.

Now get your DVD movie disc and insert it. Then run iFunia DVD to iPod Converter on your Mac and click the big button "Load..." to load your DVD movie, you may see the name of DVD movie disk if you insert DVD before running this DVD ripper tool.

Step2. Select the titles you'd like to convert
A movie DVD usually has several titles. The shorter titles on the DVD are usually the video backgrounds used in the DVD menu screens and DVD extras like movie trailers. Unless you are a graphic artist, you probably don't want to convert these titles.
* Movie: If you are ripping a movie, the longest title is usually the main feature.
* TV Shows: If you are ripping a DVD containing TV shows, you should see a list of several titles all about the same length.
dvd-to-ipod-list.jpg


Step3. Edit videos: crop, trim, add special effects or add watermark
Wanna add a personalized watermark on the output video files? You may add a text watermark or an image logo using iFunia DVD to iPod Converter for Mac. Just select the titles/chapters you'd like to add watermark, then click the button 'Edit' to open video editing window. If you want to crop DVD movies or add some special effects, click the first two tabs.
dvd-to-ipod-watermark.jpg


Step4. Change the output settings to convert videos with best quality
iPod supports H.264 and MPEG-4 video only. You may learn more details about iPod supported video formats here. If you'd like to watch movies on iPod touch without black bars, just make sure the resolution of video is 640*480 or 960*640 to get the best quality.
dvd-to-ipod-output.jpg


Here I set the output video format to 'iPod touch MPEG-4 Video (*.mp4)', Video Codec as 'H.264', Resolution as '640*480', Bitrate as '768', Frame Rate as '30', Audio Codec as 'AAC' by default. Remember that the output file size mostly depends on the Bitrate you set. Larger Bitrate, larger file size.

Step5. Start converting DVD movies
Now you may click the big button "Start" to begin converting DVD movies onto your hard disk. The Convert progress bar shows you how much of the convert process is completed. The longer your movie and the larger it's Bitrate, the longer the convert will take. The ripping time will depend on several variables including: the duration of the video file, the speed of your computer, what other activity your computer is currently doing, the codec you selected (H264 or MP4) and the bitrate you set.

Once the convert is complete, iFunia DVD to iPod Converter will place on your Mac a new version of your movie that will play on the iPod. Double-click the new file and play it to make sure it looks as you expect and sync videos to iPod via iTunes.

Tips:
* Batch conversion. iFunia DVD to iPod Converter support with multithreading and batch DVD to iPod conversion to save time .
* iFunia DVD to iPod Converter allows extract audio from DVD to MP3, M4A, AIFF, WAV formats.
* You can enjoy the built-in DVD player and take snapshot in iFunia DVD to iPod Converter.
* If you are using Windows and want to convert or rip DVD movies to iPod on PC, you can refer to iFunia DVD to iPod Converter for Windows.
 
Convert video to iTunes and sync to iPod

There are fewer ways to add video to your iPod than there are ways to add music to it. However, there are a few ways other than just buying video at the iTunes Store. How about taking the video you already have—iMovies, DVDs you own, TV shows you’ve recorded with a Mac-based digital video recorder (DVR)—and converting them so you can play them back on the new iPod?

No problem: just read on to get the lowdown on encoding and transferring your video content for viewing on-the-go. You may rip DVD movies, convert videos and then add them to to your iPod. This article covers the step-by-step guide to convert videos to iPod compatible format for syncing to your iPod.

Step 1: Download and install iPod Video Converter for Mac to convert video for iPod
We’ll be using a very nice video converter software for Mac OS called 'iFunia iPod Video Converter for Mac' for converting YouTube FLV video to iPod MP4 video, head over here and download the free trial version. Next step is to install the program.

Step 2: Run iFunia iPod Video Converter for Mac and add files
Now run iFunia iPod Video Converter on your Mac and click the big button "Add..." to add video files on your hard disk. You may add any popular video forma for converting to iPod MP4 video.

Step 3: Select the video titles that you'd like to convert
Only the titles you checked will be converted. So if there're some videos you don't want to convert, you need to uncheck them or 'Remove' them from the right-click menu. 'Clear' in the right-click menu means remove all titles in the list.
mac-ipod-converter-list.jpg


Step 4: Edit video: trim, crop, add effect, add watermark
If you just want to convert a short clip of original video to iPod for watching, trim it. Click the title you'd like to trim, then click 'Edit' button. Drag the Start & End pointer directly to trim video clip and convert it to MP4 videos for iPod. If you'd like to crop video, add special effects, add watermark for output MP4 videos, and check the options below.
mac-ipod-converter-edit.jpg


Step 5: Set the output iPod MP4 video format
There are almost all common iPod video formats available for you to choose to convert to. Here I set the output format to 'iPod Video2(640*480) MPEG4 Normal Video (*.mp4)' and the audio codec as default. Remember that the output file size mostly depends on the Bitrate you set. Larger Bitrate, larger file size.
mac-ipod-converter-output.jpg


Step 6: Start converting video to iPod MP4 file
Now you may click the big button "Start" to begin converting videos to iPod MP4 video file. Once the convert is complete, iFunia iPod Video Converter for Mac will place a new version of your video on the desktop (depends on the output folder setting). Double-click the new MP4 video file and play it to make sure it looks as you expect and sync videos to your iPod.

Tips:
* iFunia iPod Video Converter for Mac is a simple conversion tool that helps you convert all popular video like AVI, MOV, WMV, MKV, 3GP, 3G2, RM, VOB, MPEG, ASF and FLV to iPod-ready MP4 video and MP3, M4A audio.
* iFunia iPod Video Converter also can enrich the contents of your iPod in the way of editing your video sources.
* If you are using Windows and want to convert videos to iPod on PC, you can refer to iFunia iPod Video Converter for Windows.
 
How to upload and edit YouTube videos

Video editing usually requires installing software packages and having a fair amount of technical savvy. But now YouTube have introduced its new YouTube Video Editor which allows you to create video mashups and edit down clips from your library of existing YouTube video uploads. Here we will walk you through how to upload and edit the YouTube videos with the YouTube Video Editor.
youTubevideoEditor.jpg


Convert videos to the best video format for YouTube uploading
To use this YouTube Video Editor all you need is your YouTube account and a few of your own YouTube video uploads, as the YouTube Video Editor does not let you edit other user's material. So you need to upload the videos to YouTube website first. If you do not think your video file is supported by YouTube, you may get the best YouTube video uploading results from converting videos to the best YouTube video file format with iFunia Video Converter Pro for Mac.
VCproMAC.jpg


First you need to download and install iFunia Video Converter Pro for Mac, after that click on the "Add" button to add the videos which you want to upload to YouTube. You may add as many videos as you want for batch conversion. This program also has a built-in video editing tool. You can crop the video to remove black sides, trim the video and add text or image watermark. To start the video conversion step, just select the format you want and hit "Start" to begin the YouTube video conversion on Mac.

Now you have convert the videos to the YouTube supported video format, you can start uploading videos to YouTube, first login your YouTube account and press the "Browse" button to locate the YouTube video file on your computer and then press the "Upload Video" button, the amount of time required to upload a video depends upon your internet connection speed and the size of the video you're uploading. It can take anywhere from a few minutes to several hours.
uploadvideo.jpg


Edit YouTube videos with YouTube Video Editor
To get to the YouTube Video Editor, you can either head to TestTube (a directory of YouTube's Skunk Works projects) and click the "try it now" option, or visit the direct YouTube.com/editor link. When you sign in to the YouTube Video Editor, you'll see a video tab with the videos you just upload and an audio tab where you can select music tracks for your new masterpiece. To start the YouTube video editing, just click and drag your videos down to the editing panel (where the camera icon is).
editvideo.jpg


To add clips to your video you can drag them from the "my videos" section, down to the time line, or you can hit the plus icon that's in each clip's top right hand corner. In case you're not sure what a clip contains, you can mouse over it and hit the play icon to watch the whole thing without leaving the page.
editvideo2.jpg


When you hover over the clips you've selected for editing, click on the scissor icon to launch your video in a pop-up window. From there, you can shorten or lengthen your clip by moving the sliders below the main video window. When you're done, just hit save, and the YouTube Video Editor will automatically merge your edited clip with the next video in your sequence.
editvideo3.jpg


To view the edit you're in the progress of making, you can just hit the play button and it will start wherever you set your in point. Work the start and end points into the spots where you want them, then hit save to finish the edit for that particular clip.

Add music to YouTube videos with the YouTube Video Editor (optional)
If you want to use a music soundtrack for your YouTube videos instead of the recorded sound you picked up while filming, you can click on the audio tab at the top to reveal YouTube's AudioSwap library. AudioSwap contains "tens of thousands of songs" that you can freely use in your YouTube Video Editor. All you have to do is select a song and either drags it down to the soundtrack editor or just press the plus sign to the right of each title.

You should also note that some AudioSwap tracks are subject to licensing agreements, which means YouTube may include advertisements when certain tracks are used. You also can't edit the AudioSwap track, so the song will only play from the beginning until your video stops.

Once you have finished the YouTube video editing, you just give it a title, and hit publish, YouTube will takes care of the rest. Keep in mind that the new YouTube Video Editor is still a work in progress, so you might get hit with a few bugs as you try it out.
 
Back
Top